Hướng dẫn khắc phục lỗ hổng bảo mật CVE-2019-11477 trên Cloud365
Hướng dẫn khắc phục lỗ hổng bảo mật CVE-2019-11477 trên Cloud365
Nơi chứa các tài liệu tham khảo của dịch vụ Cloud365.
HAProxy viết tắt của High Availability Proxy, là công cụ mã nguồn mở nổi tiếng ứng dụng cho giải pháp cân bằng tải TCP/HTTP cũng như giải pháp máy chủ Proxy (Proxy Server). HAProxy có thể chạy trên các mỗi trường Linux, Solaris, FreeBSD. Công dụng phổ biến nhất của HAProxy là cải thiện hiệu năng, tăng độ tin cậy của hệ thống máy chủ bằng cách phân phối khối lượng công việc trên nhiều máy chủ (như Web, App, cơ sở dữ liệu). HAProxy hiện đã và đang được sử dụng bởi nhiều website lớn như GoDaddy, GitHub, Bitbucket, Stack Overflow, Reddit, Speedtest.net, Twitter và trong nhiều sản phẩm cung cấp bởi Amazon Web Service.
Dịch vụ keepalived sử dụng với mục đích tạo ra virtual ip address (IP VIP) cho hệ thống. Tiến trình keepalived có thể tự động giám sát dịch vụ hoặc hệ thống và có khả năng chịu lỗi cho hệ thống khi dịch vụ hoặc hệ điều hành xảy ra vấn đề. Trong bài hướng dẫn, tôi sẽ sử dụng keepalived để tăng tính sẵn sàng cho dịch vụ cân bằng tải.

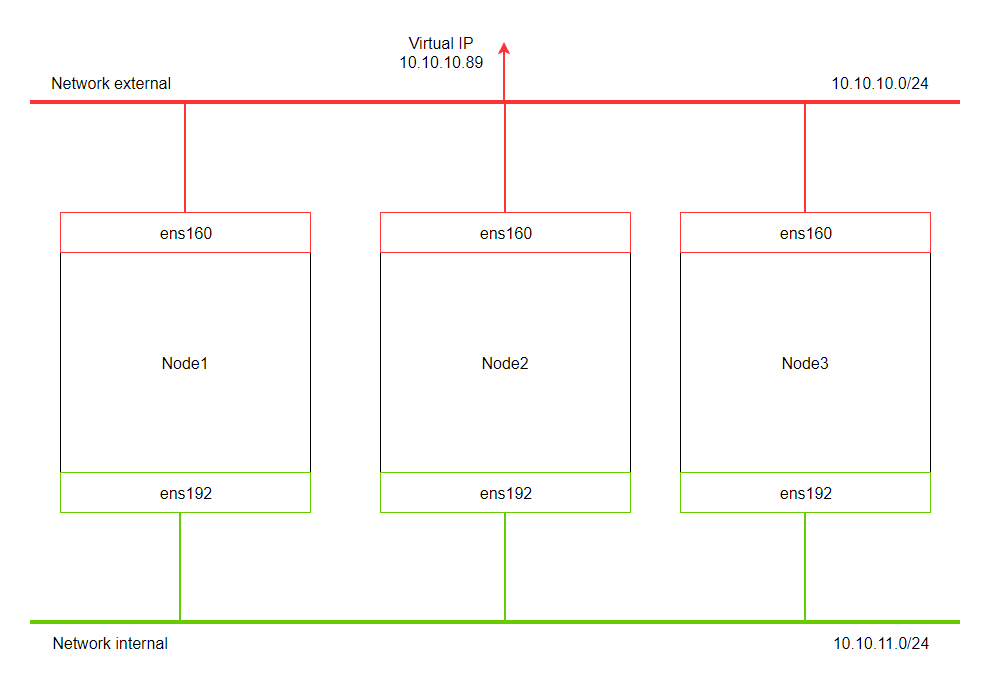
Mô hình triển khai
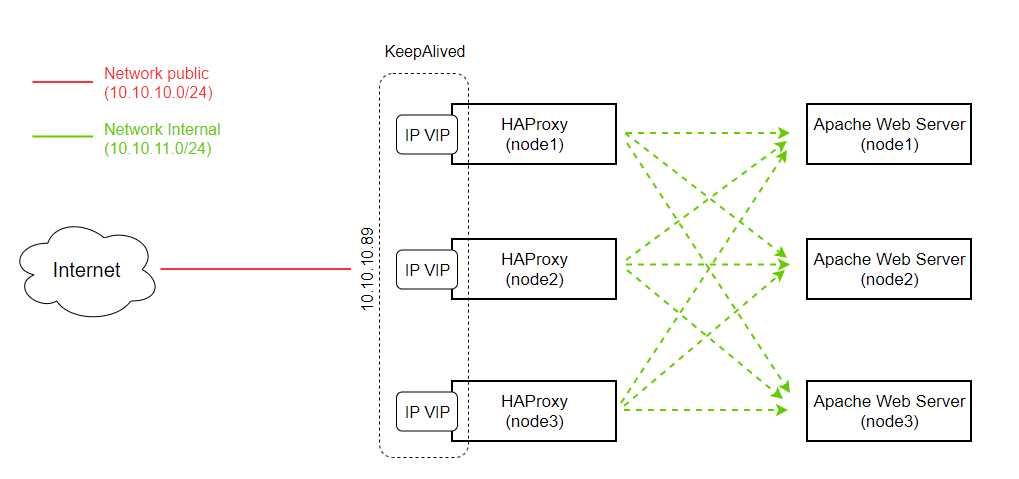
Mô hình hoạt động
Thực hiện tại node1
yum install httpd -y
cat /etc/httpd/conf/httpd.conf | grep 'Listen 80'
sed -i "s/Listen 80/Listen 10.10.11.86:8081/g" /etc/httpd/conf/httpd.conf

echo '<h1>Chào mừng tới Blog Cloud365 (Web1)</h1>' > /var/www/html/index.html
systemctl start httpd
systemctl enable httpd
Thực hiện tại node2
yum install httpd -y
cat /etc/httpd/conf/httpd.conf | grep 'Listen 80'
sed -i "s/Listen 80/Listen 10.10.11.87:8081/g" /etc/httpd/conf/httpd.conf

echo '<h1>Chào mừng tới Blog Cloud365 (Web2)</h1>' > /var/www/html/index.html
systemctl start httpd
systemctl enable httpd
Thực hiện tại node3
yum install httpd -y
cat /etc/httpd/conf/httpd.conf | grep 'Listen 80'
sed -i "s/Listen 80/Listen 10.10.11.88:8081/g" /etc/httpd/conf/httpd.conf

echo '<h1>Chào mừng tới Blog Cloud365 (Web3)</h1>' > /var/www/html/index.html
systemctl start httpd
systemctl enable httpd
Cài đặt gói Keepalive trên cả 3 node
yum install keepalived -y
Lưu ý: Tôi sẽ mô tả cách cấu hình trước. Sau phần mô tả sẽ có file cấu hình mẫu keepalive trên cả 3 node
Trong bài, chúng ta sẽ sử dụng keepalive để kiếm tra trạng thái của HAProxy trong mỗi 2 giây, và nếu kiếm tra thành công node sẽ được + 2 điểm.
vrrp_script chk_haproxy {
    script "killall -0 haproxy" # check the haproxy process
    interval 2 # every 2 seconds
    weight 2 # add 2 points if OK
}
Tiếp theo chúng ta sẽ tạo block với tên vrrp_instance. Đây là thành phần chính khi cấu hình HA cho dịch vụ HAProxy. Theo bài, tôi cấu hình cho keepalived kết nối với các dịch vụ tương tự nó thuộc các node khác thông giao diện mạng ens160. Mô hình keepalive là MASTER - SLAVE nên chúng ta cần chỉ định node Master và node Slave. Trong bài tôi sẽ cấu hình node1 làm node master với tham số state băng MASTER và node2, node3 làm node slave với cấu hình state bằng BACKUP.
# Trên Node1
vrrp_instance VI_1 {
    interface ens160
    state MASTER
    ..
}

# Trên Node2
vrrp_instance VI_1 {
    interface ens160
    state BACKUP
    ..
}

# Trên Node3
vrrp_instance VI_1 {
    interface ens160
    state BACKUP
    ..
}
Tiếp theo, chúng ta cần quan tâm tới giá trị priority trên mỗi node. Giá trị ưu tiên lần lượt trên node1 node2 node3 sẽ bằng 101 100 99.
# Trên Node1
vrrp_instance VI_1 {
    ..
    priority 101
    ..
}

# Trên Node2
vrrp_instance VI_1 {
    ..
    priority 100
    ..
}

# Trên Node3
vrrp_instance VI_1 {
    ..
    priority 99
    ..
}
Cụm cần chỉ định một ID chia sẽ giữa các node. Tôi sẽ sử dụng giá trị 51 trong bài.
vrrp_instance VI_1 {
    ..
    virtual_router_id 51
    ..
}
Để khai báo IP VIP cho cụm 3 node. Tôi sẽ sử dụng block virtual_ipaddress, khai báo 1 IP cùng dải ens160. Ở đây tôi chọn ip 10.10.10.89
vrrp_instance VI_1 {
    ..
    virtual_ipaddress {
        10.10.10.89/24 # virtual ip address
    }
    ..
}
Cuối cùng là track_script. track-script giúp keepalived xác định node nào sẽ nắm IP VIP. Như trong bài node1 được cấu hình với độ ưu tiên bằng 101. Nếu node1 kiểm tra dịch vụ HAProxy thành công thì độ ưu tiên của nó không đổi nhưng nếu kiếm tra thất bại thì độ ưu tiên của node1 sẽ giảm đi 2 và thập hơn node2. Khi đó node2 sẽ được chuyển IP VIP sang. Đây là cách dịch vụ keepalived hoạt động.
File cấu hình đầy đủ
Cấu hình keepalived trên node1
echo '
vrrp_script chk_haproxy {
    script "killall -0 haproxy"
    interval 2
    weight 2
}
vrrp_instance VI_1 {
    interface ens160
    state MASTER
    virtual_router_id 51
    priority 101
    virtual_ipaddress {
        10.10.10.89/24
    }
    track_script {
        chk_haproxy
    }
}' > /etc/keepalived/keepalived.conf
Cấu hình keepalived trên node2
echo '
vrrp_script chk_haproxy {
    script "killall -0 haproxy"
    interval 2
    weight 2
}
vrrp_instance VI_1 {
    interface ens160
    state BACKUP
    virtual_router_id 51
    priority 100
    virtual_ipaddress {
        10.10.10.89/24
    }
    track_script {
        chk_haproxy
    }
}' > /etc/keepalived/keepalived.conf
Cấu hình keepalived trên node3
echo '
vrrp_script chk_haproxy {
    script "killall -0 haproxy"
    interval 2
    weight 2
}
vrrp_instance VI_1 {
    interface ens160
    state BACKUP
    virtual_router_id 51
    priority 99
    virtual_ipaddress {
        10.10.10.89/24
    }
    track_script {
        chk_haproxy
    }
}' > /etc/keepalived/keepalived.conf
Khởi động dịch vụ trên 3 node
systemctl start keepalived
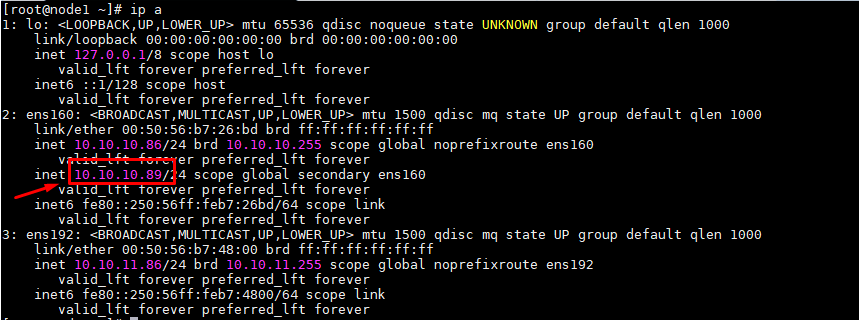
Kiểm tra node1, chúng ta sẽ thấy IP VIP do keepalive quản lý
Thực hiện trên tất cả các node
Cài đặt
sudo yum install wget socat -y
wget http://cbs.centos.org/kojifiles/packages/haproxy/1.8.1/5.el7/x86_64/haproxy18-1.8.1-5.el7.x86_64.rpm
yum install haproxy18-1.8.1-5.el7.x86_64.rpm -y
Tạo bản backup cho cấu hình mặc định và chỉnh sửa cấu hình HAproxy
cp /etc/haproxy/haproxy.cfg /etc/haproxy/haproxy.cfg.bak
Cầu hình Haproxy
echo 'global
    log         127.0.0.1 local2
    chroot      /var/lib/haproxy
    pidfile     /var/run/haproxy.pid
    maxconn     4000
    user        haproxy
    group       haproxy
    daemon
    stats socket /var/lib/haproxy/stats

defaults
    mode                    http
    maxconn                 8000
    log                     global
    option                  httplog
    option                  dontlognull
    option http-server-close
    retries                 3
    timeout http-request    20s
    timeout queue           1m
    timeout connect         10s
    timeout client          1m
    timeout server          1m
    timeout http-keep-alive 10s
    timeout check           10s

listen stats
    bind *:8080 interface ens160
    mode http
    stats enable
    stats uri /stats
    stats realm HAProxy\ Statistics
    stats admin if TRUE

listen web-backend
    bind *:80
    balance  roundrobin
    cookie SERVERID insert indirect nocache
    mode  http
    option  httpchk
    option  httpclose
    option  httplog
    option  forwardfor
    server node1 10.10.11.86:8081 check cookie node1 inter 5s fastinter 2s rise 3 fall 3
    server node2 10.10.11.87:8081 check cookie node2 inter 5s fastinter 2s rise 3 fall 3
    server node3 10.10.11.88:8081 check cookie node3 inter 5s fastinter 2s rise 3 fall 3' > /etc/haproxy/haproxy.cfg
Cấu hình Log cho HAProxy
sed -i "s/#\$ModLoad imudp/\$ModLoad imudp/g" /etc/rsyslog.conf
sed -i "s/#\$UDPServerRun 514/\$UDPServerRun 514/g" /etc/rsyslog.conf
echo '$UDPServerAddress 127.0.0.1' >> /etc/rsyslog.conf

echo 'local2.*    /var/log/haproxy.log' > /etc/rsyslog.d/haproxy.conf

systemctl restart rsyslog
Bổ sung cấu hình cho phép kernel có thể binding tới IP VIP
echo 'net.ipv4.ip_nonlocal_bind = 1' >> /etc/sysctl.conf
Kiểm tra
$ sysctl -p

net.ipv4.ip_nonlocal_bind = 1
Khởi tạo dịch vụ HAProxy
systemctl restart haproxy
systemctl enable haproxy
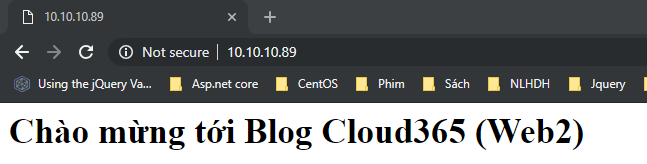
Kết quả
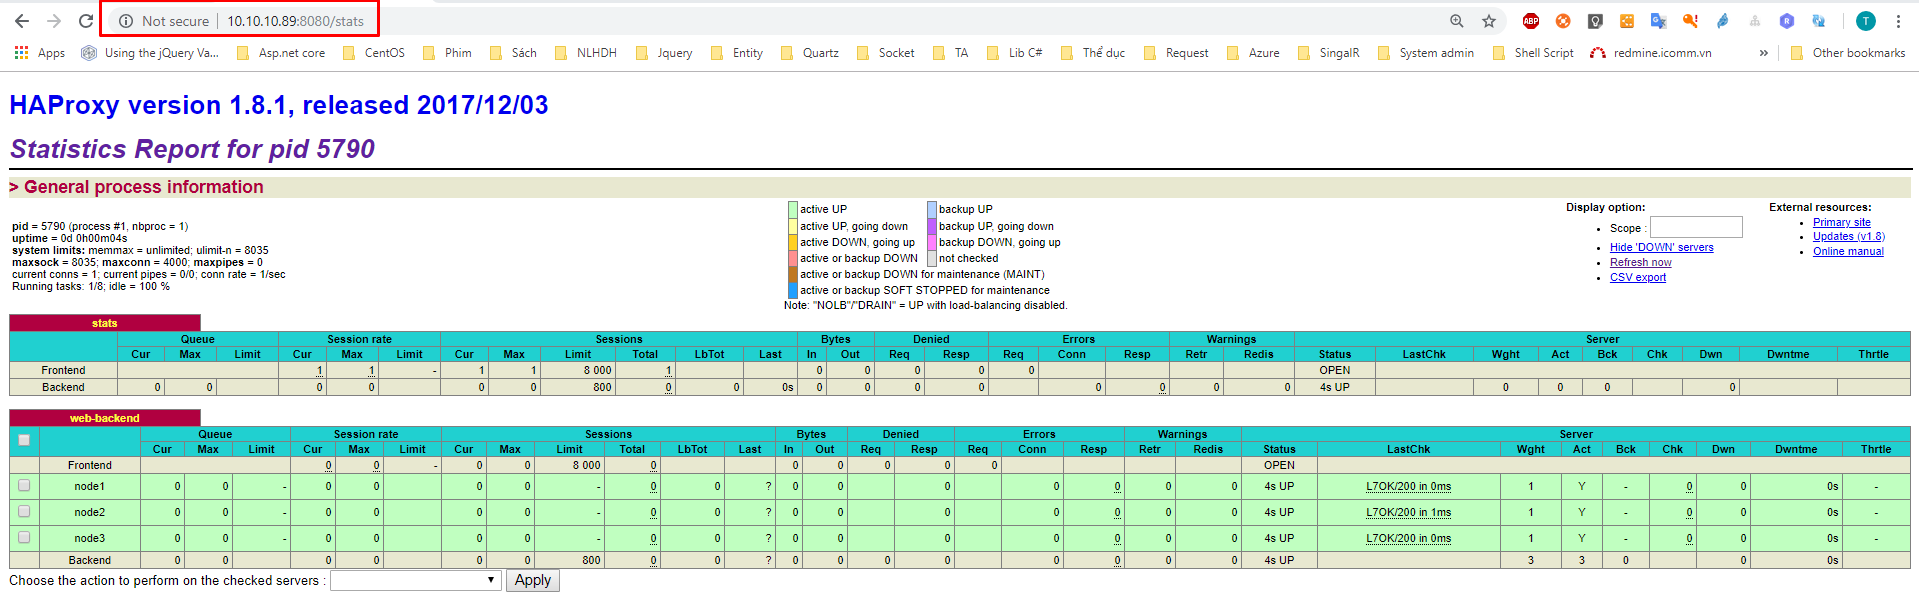
Do tôi cấu hình sticky session trên request vì vậy trong một thời điểm chỉ có thể kết nối tới 1 webserver. Để truy cập tới các webserver còn lại, các bạn có thể tạo phiên ẩn danh và truy cập lại.

Khi truy cập trình ẩn danh
Đến đây tôi đã giới thiệu cho các bạn sử dụng Keepalived để tăng tính sẵn sàng cho dịch vụ cân bằng tải, cũng như dịch vụ Web. Ngoài ra các bạn có thể tham khảo thêm seri High Availability và tổng quan về HAProxy để có thêm thông tin.
Thực hiện bởi cloud365.vn