Hướng dẫn khắc phục lỗ hổng bảo mật CVE-2019-11477 trên Cloud365
Hướng dẫn khắc phục lỗ hổng bảo mật CVE-2019-11477 trên Cloud365
Nơi chứa các tài liệu tham khảo của dịch vụ Cloud365.
Tài liệu hướng dẫn cài đặt HAProxy WI làm giao diện Web cho HAProxy trên CentOS 7
HAProxy viết tắt (High Availability Proxy) là phần mềm mã nguồn mở, cung cấp dịch vụ cân bằng tải, proxy cho TCP/HTTP dựa trên request người dùng. HAProxy hiện đã và đang được sử dụng bởi nhiều website lớn như GoDaddy, GitHub, Bitbucket, Stack Overflow, Reddit, Speedtest.net, Twitter và trong nhiều sản phẩm cung cấp bởi Amazon Web Service.
HAProxy WI là công cụ mã nguồn mở, được phát triển với mục đích tạo ra giao diện Web thân thiện cho người sử dụng HAProxy. Xem thêm

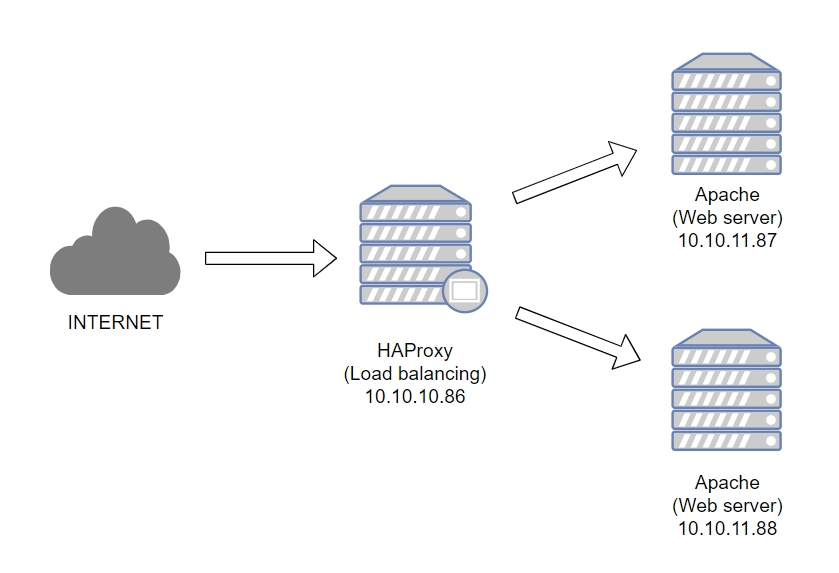
loadbalancerThiết lập hostname, cập nhật hệ thống
hostnamectl set-hostname loadbalancer
yum update -y
Tắt Firewall và SELinux
sed -i 's/SELINUX=enforcing/SELINUX=disabled/g' /etc/sysconfig/selinux
sed -i 's/SELINUX=enforcing/SELINUX=disabled/g' /etc/selinux/config
systemctl stop firewalld
systemctl disable firewalld
Cấu hình Host file
echo "10.10.11.86 loadbalancer" >> /etc/hosts
echo "10.10.11.87 web1" >> /etc/hosts
echo "10.10.11.88 web2" >> /etc/hosts
Khởi động lại hệ thống
init 6
web1Thiết lập hostname, cập nhật hệ thống
hostnamectl set-hostname web1
yum update -y
Tắt Firewall và SELinux
sed -i 's/SELINUX=enforcing/SELINUX=disabled/g' /etc/sysconfig/selinux
sed -i 's/SELINUX=enforcing/SELINUX=disabled/g' /etc/selinux/config
systemctl stop firewalld
systemctl disable firewalld
Cấu hình Host file
echo "10.10.11.86 loadbalancer" >> /etc/hosts
echo "10.10.11.87 web1" >> /etc/hosts
echo "10.10.11.88 web2" >> /etc/hosts
Khởi động lại hệ thống
init 6
web2Thiết lập hostname, cập nhật hệ thống
hostnamectl set-hostname web2
yum update -y
Tắt Firewall và SELinux
sed -i 's/SELINUX=enforcing/SELINUX=disabled/g' /etc/sysconfig/selinux
sed -i 's/SELINUX=enforcing/SELINUX=disabled/g' /etc/selinux/config
systemctl stop firewalld
systemctl disable firewalld
Cấu hình Host file
echo "10.10.11.86 loadbalancer" >> /etc/hosts
echo "10.10.11.87 web1" >> /etc/hosts
echo "10.10.11.88 web2" >> /etc/hosts
Khởi động lại hệ thống
init 6
Tải repo
git clone https://github.com/lacoski/haproxy-wi.git /var/www/haproxy-wi
Chạy script cài đặt mã nguồn
cd /var/www/haproxy-wi
chmod +x install.sh
sudo ./install.sh
Script cài đặt sẽ yêu cầu lựa chọn cơ sở dữ liệu, port, và đường dần cài đặt cho HAProxy WI. Ở đây tôi sẽ sử dụng database SQLite, port 8088 và sử dụng đường dẫn mặc định cho HAProxy WI.
Giá trị thiết lập
Choose DB: (1)Sqlite or (2)Mysql? Default: Sqlite
1
Choose Haproxy-WI port. Default: [8080]
8088
Enter Haproxy-wi home dir. Default: /var/www/[haproxy-wi]
Quá trình cài đặt có thể mất từ 3-5 phút, kết quả sau khi cài xong
################################


Installation Succesful


################################
################################


 Starting Services


################################
Created symlink from /etc/systemd/system/multi-user.target.wants/httpd.service to /usr/lib/systemd/system/httpd.service.
################################


Services have been started, Please Evaluate the tool by adding a host / DNS ectry for  /etc/hosts file.
 This can be done by adding an entry like this
 192.168.1.100 haprox-wi.example.com


################################
################################


 Thank You for Evaluating Haproxy-wi


################################
DB was update to 3.2.3<br />
DB was update to 3.2.8<br />
DB was update to 3.3<br />
Updating... go to version 3.4.1<br />
DB was update to 3.4.1<br />
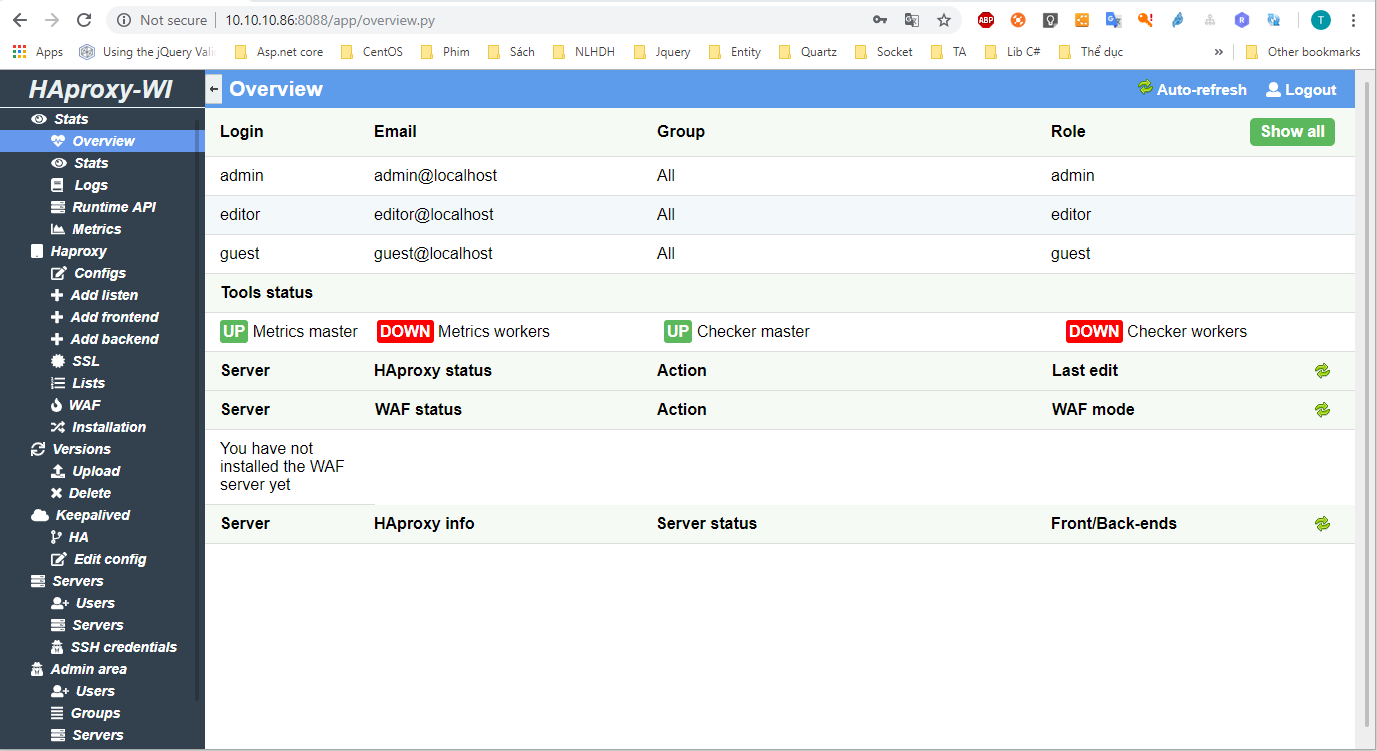
Sau khi thấy thông báo trên, sử dụng trình duyệt truy cập đường dẫn ‘http://10.10.10.86:8088/app/login.py’
Đăng nhập với tài khoản mặc định với user và mật khẩu như sau admin/admin
Kết quả
Thực hiện tại web1
yum install httpd -y
cat /etc/httpd/conf/httpd.conf | grep 'Listen 80'
sed -i "s/Listen 80/Listen 10.10.11.87:80/g" /etc/httpd/conf/httpd.conf

echo '<h1>Chào mừng tới Blog Cloud365 (Web1)</h1>' > /var/www/html/index.html
systemctl start httpd
systemctl enable httpd
Thực hiện tại web2
yum install httpd -y
cat /etc/httpd/conf/httpd.conf | grep 'Listen 80'
sed -i "s/Listen 80/Listen 10.10.11.88:80/g" /etc/httpd/conf/httpd.conf

echo '<h1>Chào mừng tới Blog Cloud365 (Web2)</h1>' > /var/www/html/index.html
systemctl start httpd
systemctl enable httpd
Đăng nhập vào giao diện Web ‘http://10.10.10.86:8088/app/login.py’, sử dụng tài khoản mặc định với user và mật khẩu như sau admin/admin
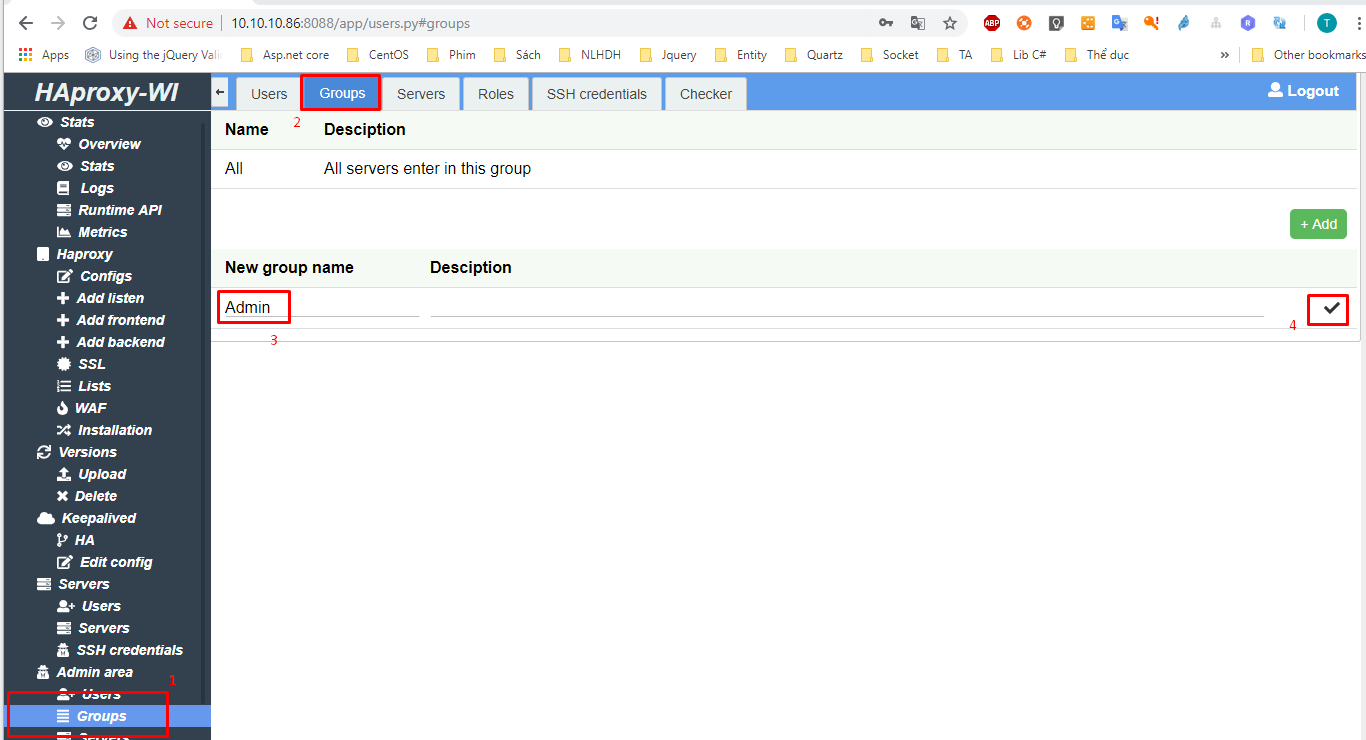
Tạo mới group và user trên HAProxy WI (Không sử dụng tài khoản admin)
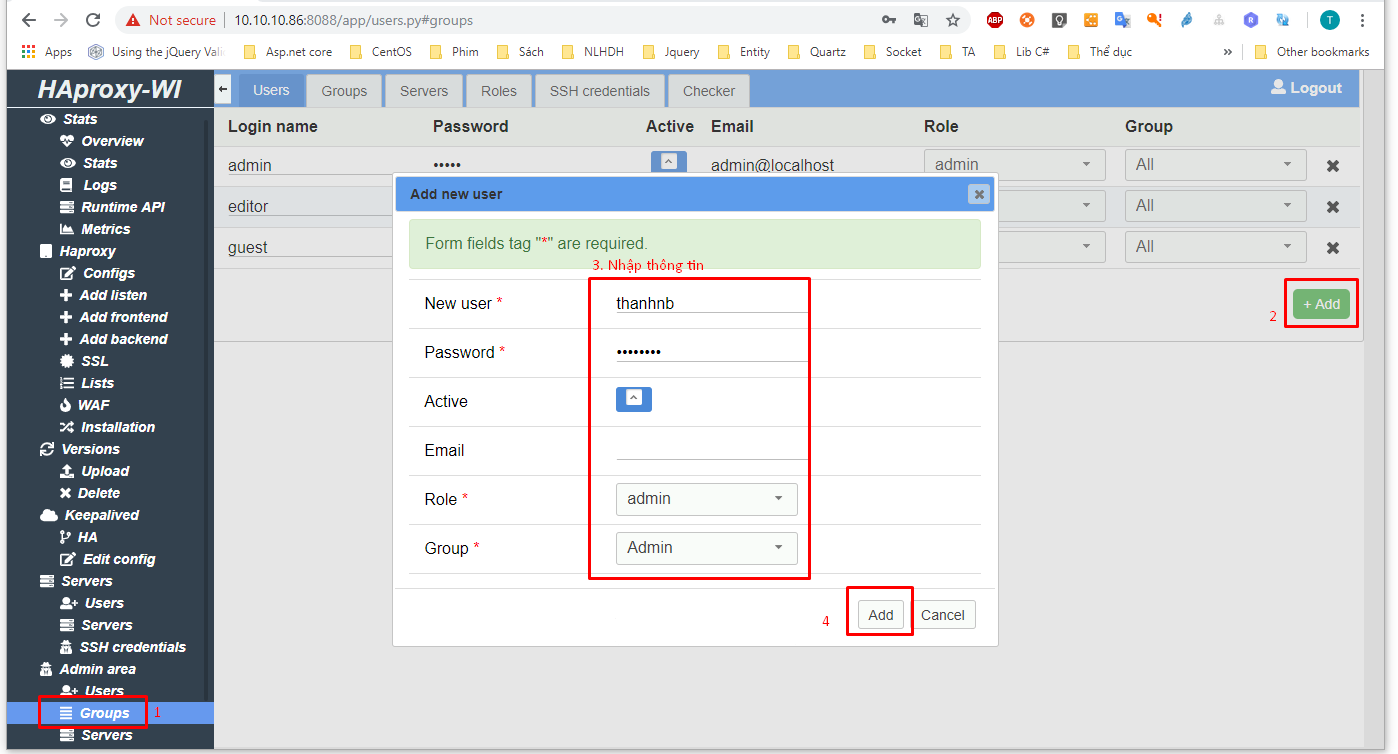
Đăng xuất tài khoản Admin, truy cập với tài khoản vừa tạo (thanhnb)
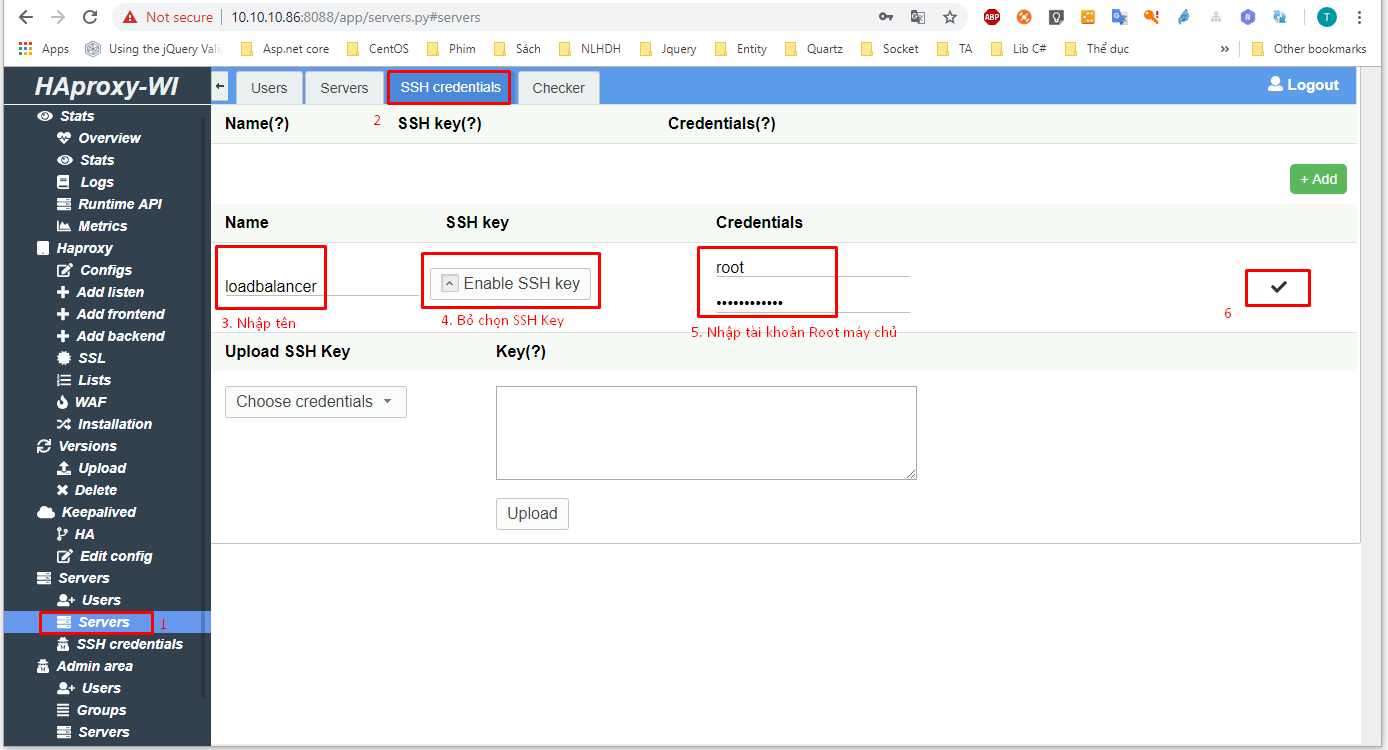
Sau khi đăng nhập vời tài khoản vừa tạo, tạo mới chứng chỉ SSH cho phép HAProxy WI cài đặt dịch vụ HAProxy tới server loadbalancer
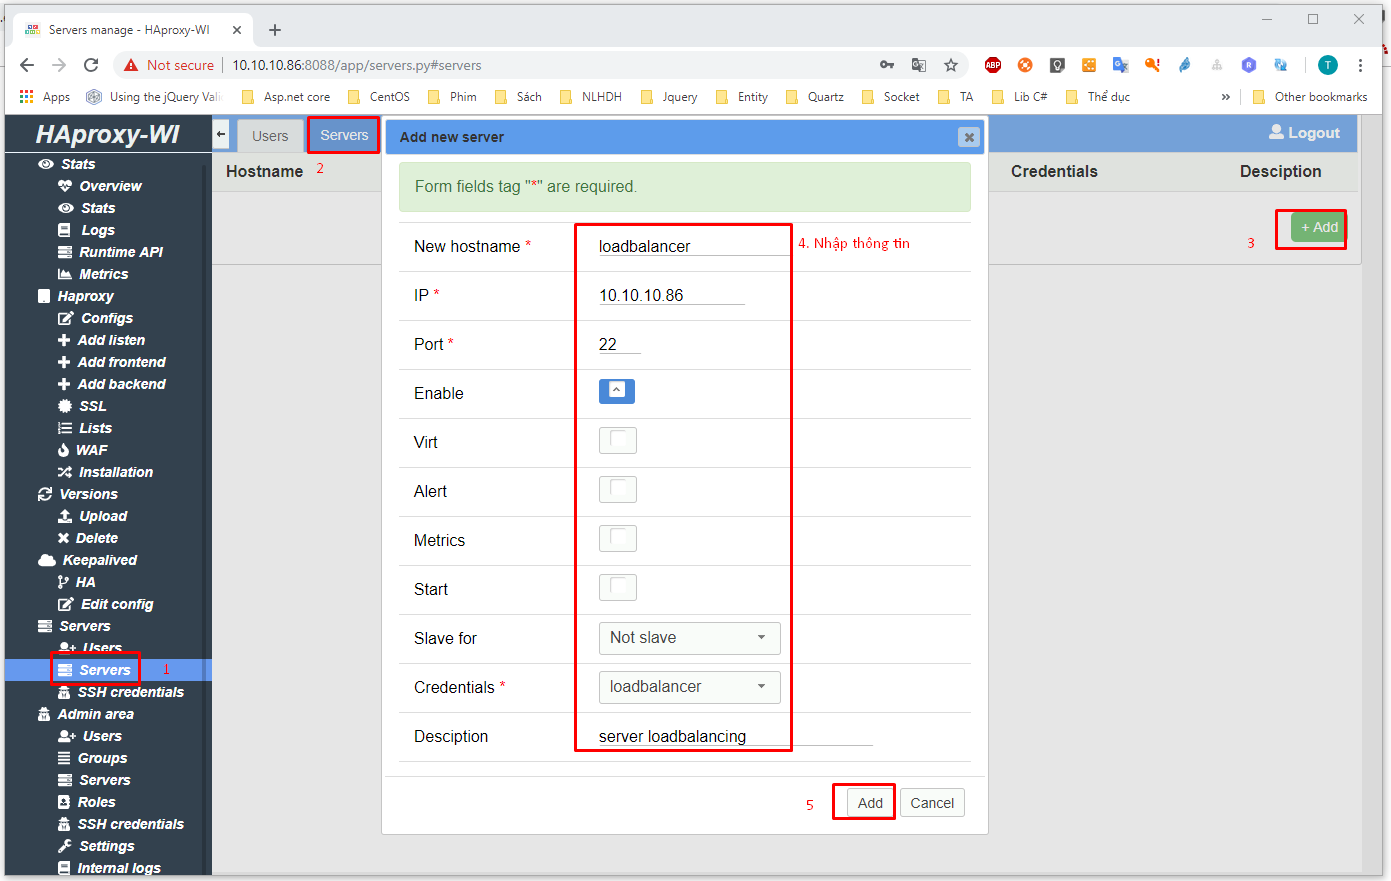
Tạo mới server dựa trên chứng chỉ vừa tạo
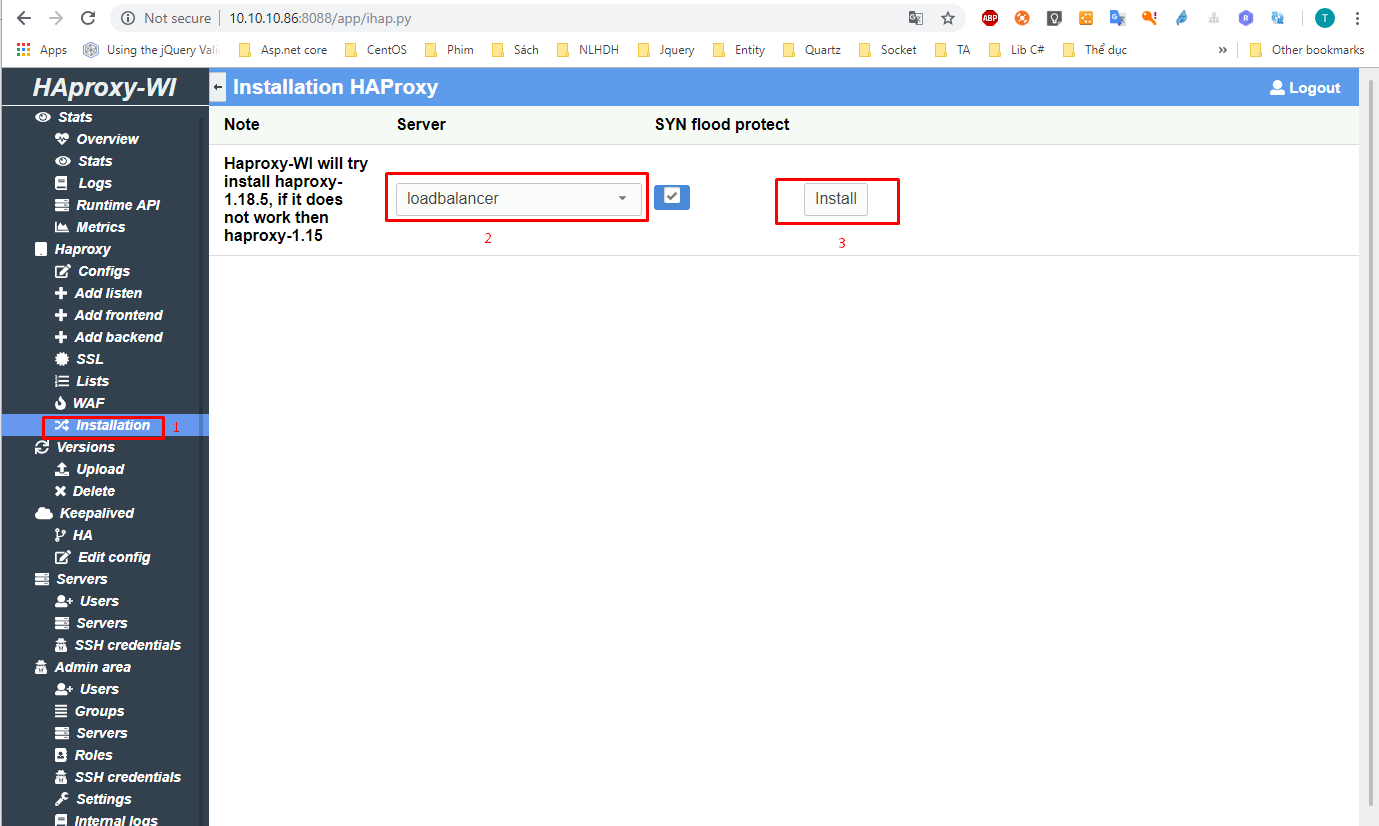
Cài đặt HAProxy tới server loadbalancer thông qua HAProxy WI, quá trình cài đặt sẽ mất 3-5 phút.
Sau khi cài đặt xong, trở về trang chủ
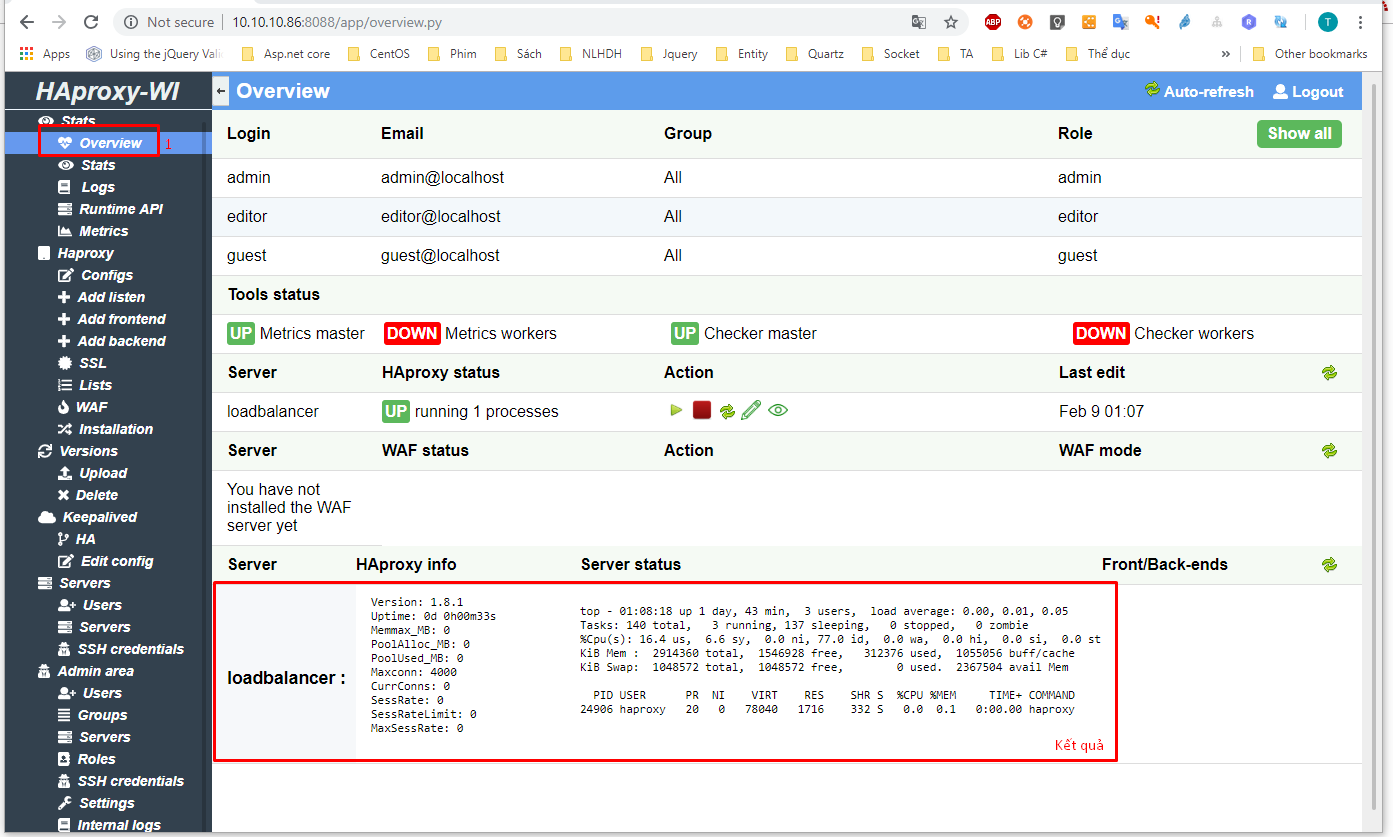
Kiểm tra tại dịch vụ tại node loadbalancer
[root@loadbalancer ~]# systemctl status haproxy
● haproxy.service - HAProxy Load Balancer
   Loaded: loaded (/usr/lib/systemd/system/haproxy.service; enabled; vendor preset: disabled)
   Active: active (running) since Sat 2019-02-09 01:07:44 +07; 2min 13s ago
  Process: 24905 ExecStart=/usr/sbin/haproxy -f /etc/haproxy/haproxy.cfg -p /run/haproxy.pid $OPTIONS (code=exited, status=0/SUCCESS)
 Main PID: 24906 (haproxy)
   CGroup: /system.slice/haproxy.service
           └─24906 /usr/sbin/haproxy -f /etc/haproxy/haproxy.cfg -p /run/haproxy.pid

Feb 09 01:07:44 node1 systemd[1]: Starting HAProxy Load Balancer...
Feb 09 01:07:44 node1 systemd[1]: Started HAProxy Load Balancer.
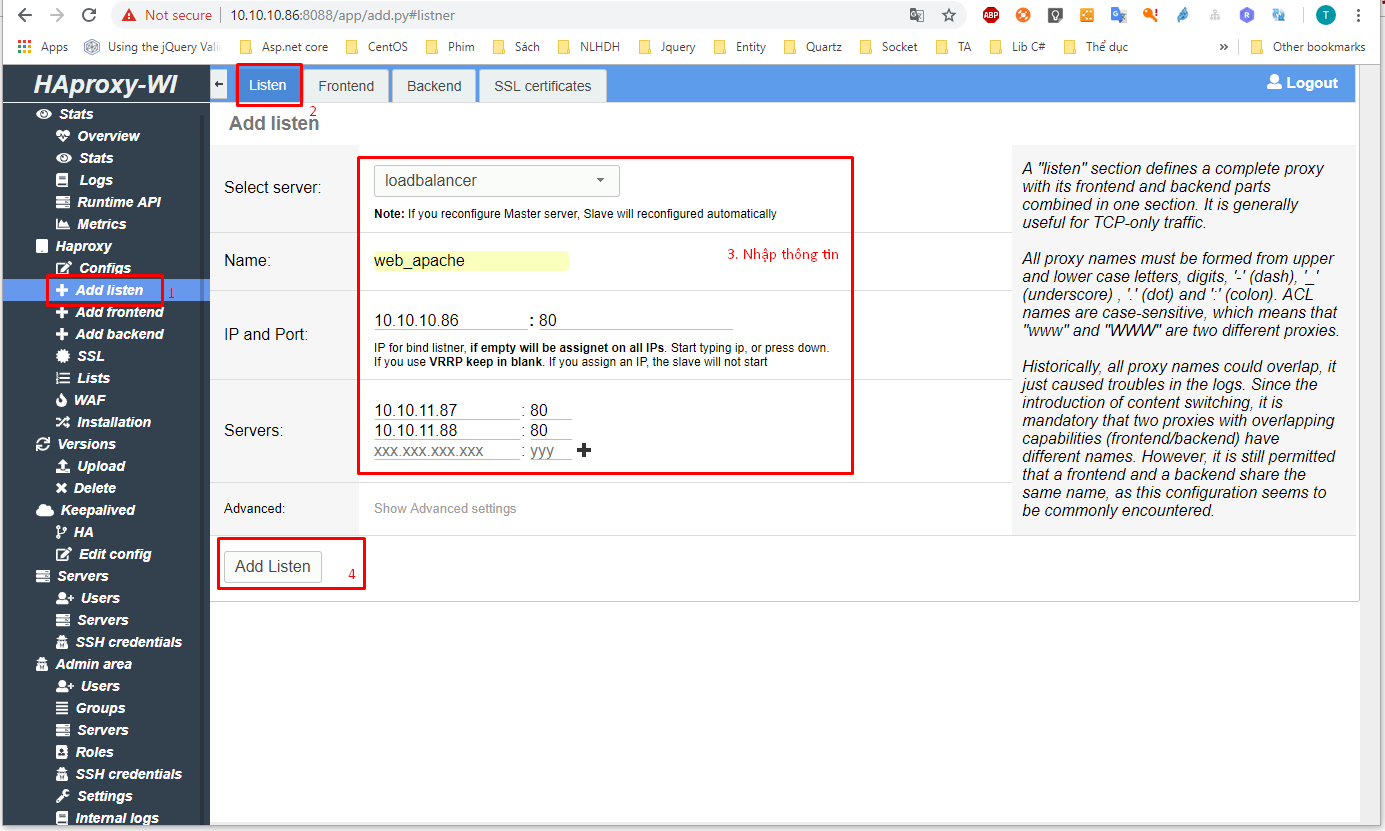
Thêm mới backend cân bẳng tải thông qua Haproxy WI
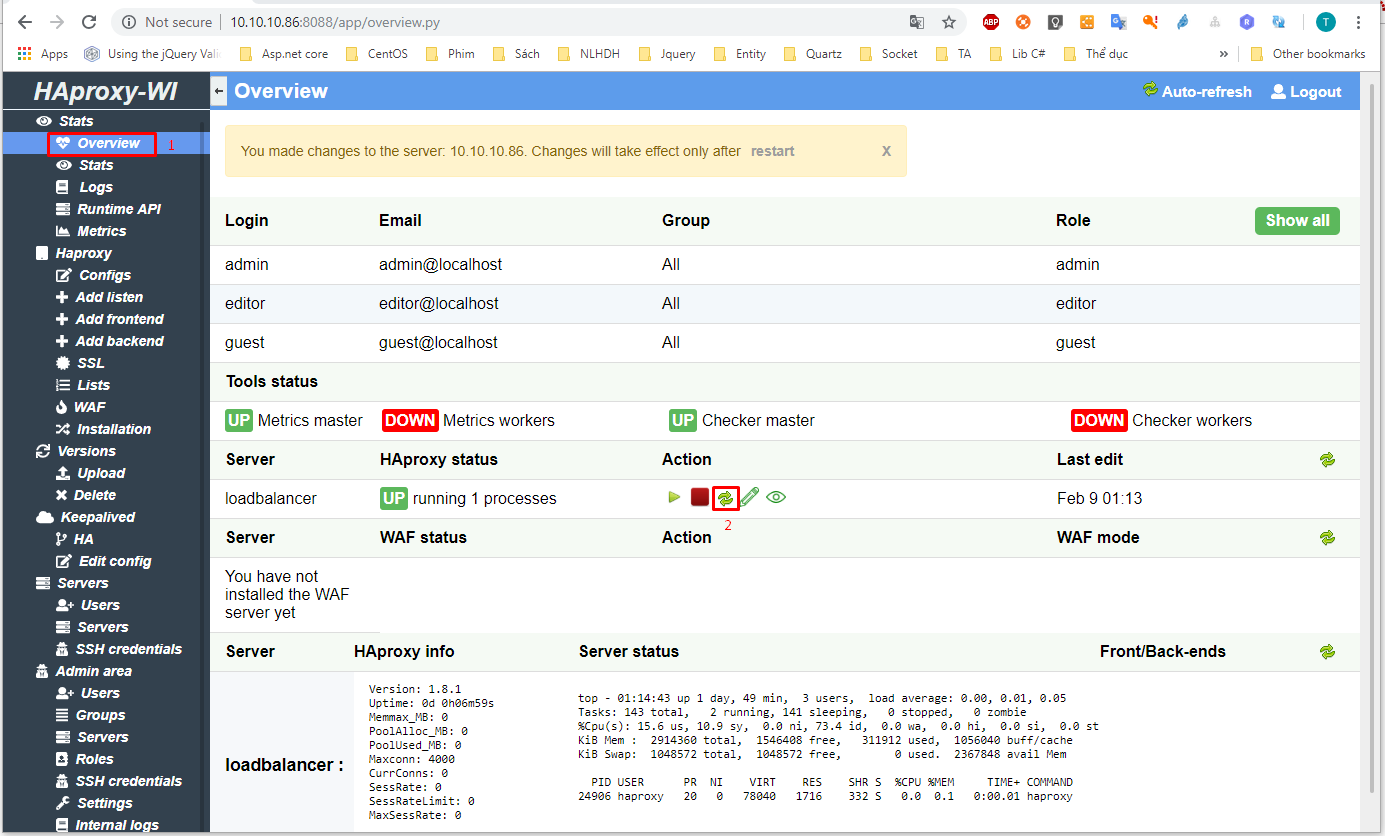
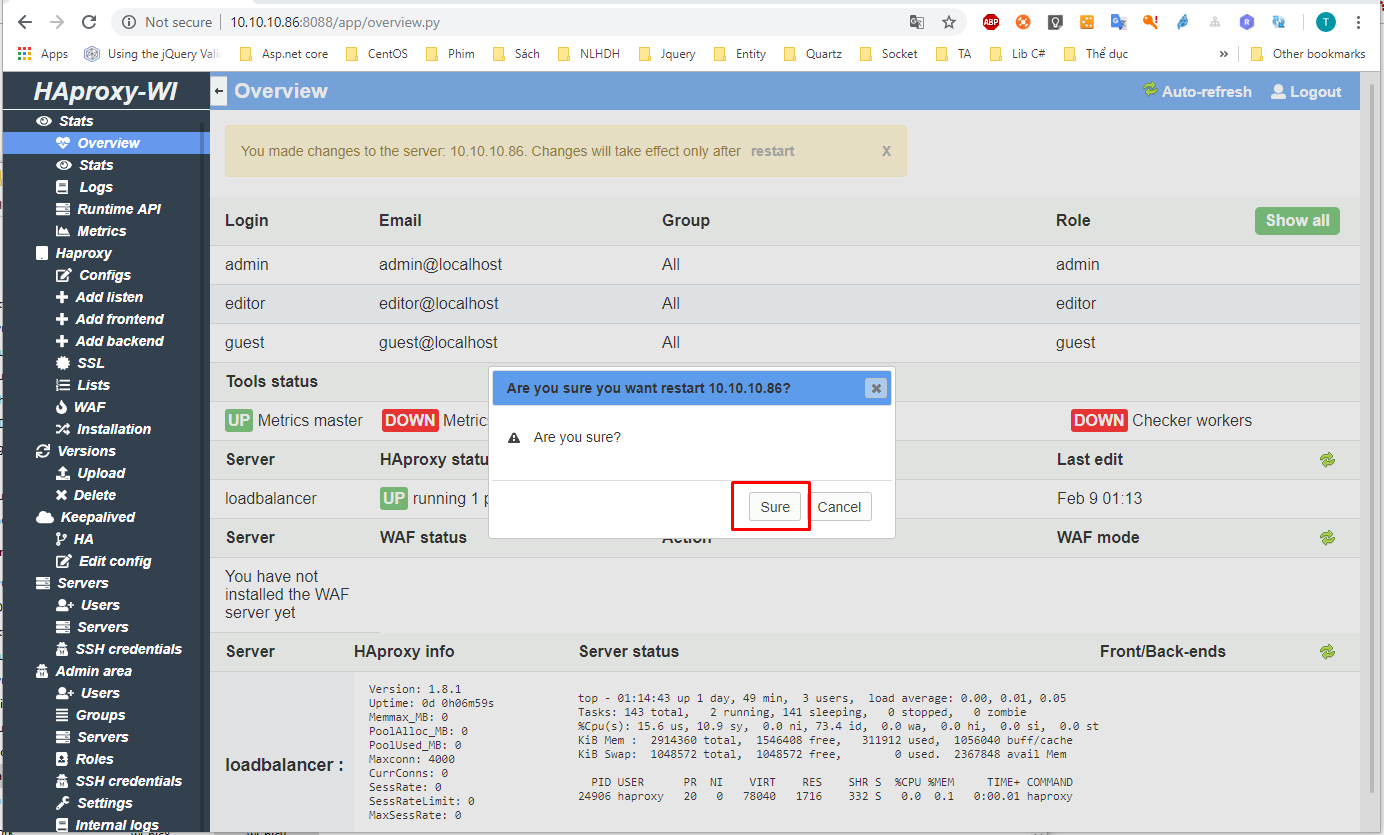
Sau khi thêm backend bạn cần restart lại dịch vụ HAproxy, ở đây tôi sẽ sử dụng HAProxy WI để khởi động lại HAProxy (Thông qua giao diện Web)
Truy cập địa chỉ http://10.10.10.86:8085/stats với tài khoản admin/password
Kết quả
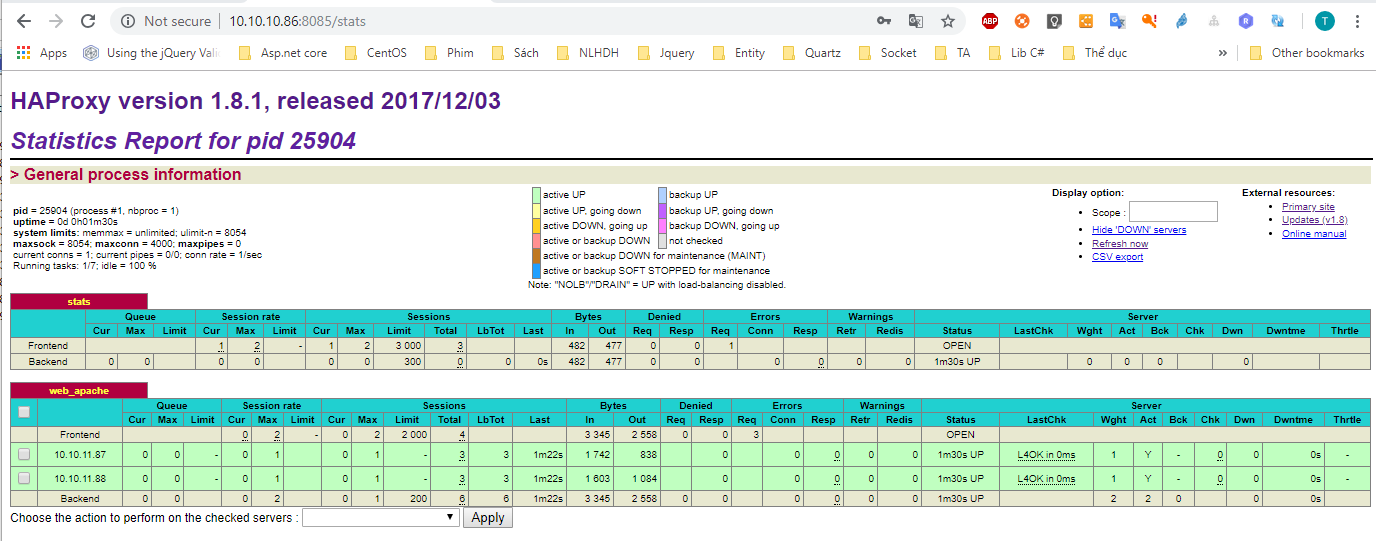
Kết quả lần 1
Kết quả lần 2
https://github.com/Aidaho12/haproxy-wi
Thực hiện bởi cloud365.vn