Hướng dẫn khắc phục lỗ hổng bảo mật CVE-2019-11477 trên Cloud365
Hướng dẫn khắc phục lỗ hổng bảo mật CVE-2019-11477 trên Cloud365
Nơi chứa các tài liệu tham khảo của dịch vụ Cloud365.
Apache và Nginx là hai máy chủ web mã nguồn mở phổ biến thường được sử dụng với PHP. Cả Apache và Nginx đều có những ưu và nhược điểm khác nhau, tùy vào nhu cầu sử dụng mà ta có thể lựa chọn web server nào cho phù hợp. Tuy nhiên, ta hoàn toàn có thể tận dụng thế mạnh của cả Apache và Nginx bằng cách kết hợp chúng với nhau. Bài viết sau đây sẽ hướng dẫn các bạn làm cách nào để có thể kết hợn Nginx làm proxy cho Apache
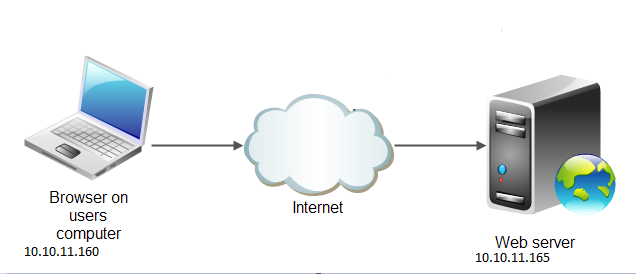
Webserver: Chuẩn bị một máy chủ cài đặt OS Centos 7.6.1810 có địa chỉ IP public 10.10.11.165 Máy Client: Chuẩn bị một máy client cài đặt OS Win 10 để kiểm tra truy cập website với IP client 10.10.11.160
Các bạn có thể tham khảo bài viết hướng dẫn cài đặt nginx tại đây
Chúng ta sử dụng lệnh yum để cài đặt apache
yum install httpd
Chúng ta sẽ thay đổi cấu hình của file nginx.conf như sau
mv /etc/nginx/nginx.conf /etc/nginx/nginx.conf.bak
cd /etc/nginx/
cat >> nginx.conf << EOF
worker_processes 4;
pid /var/run/nginx.pid;

events {
        worker_connections 768;
}

http {

        sendfile on;
        tcp_nopush on;
        tcp_nodelay on;
        keepalive_timeout 65;
        types_hash_max_size 2048;

        include /etc/nginx/mime.types;
        default_type application/octet-stream;

        access_log /var/log/nginx/access.log;
        error_log /var/log/nginx/error.log;

        gzip on;
        gzip_disable "msie6";
        gzip_min_length  1100;
        gzip_buffers  4 32k;
        gzip_types    text/plain application/x-javascript text/xml text/css;

        open_file_cache          max=10000 inactive=10m;
        open_file_cache_valid    2m;
        open_file_cache_min_uses 1;
        open_file_cache_errors   on;

        ignore_invalid_headers on;
        client_max_body_size    8m;
        client_header_timeout  3m;
        client_body_timeout 3m;
        send_timeout     3m;
        connection_pool_size  256;
        client_header_buffer_size 4k;
        large_client_header_buffers 4 32k;
        request_pool_size  4k;
        output_buffers   4 32k;
        postpone_output  1460;


        include /etc/nginx/conf.d/*.conf;
        include /etc/nginx/sites-enabled/*;
}
EOF
Tạo file Vhost cho nginx, file cấu hình của vhost sẽ được lưu trong đường dẫn /etc/nginx/conf.d/ và /etc/nginx/sites-enabled/
Trong bài viết này sử dụng domain quyenbx.name.vn nên file config sẽ được tạo với tên quyenbx.name.vn.conf để phân biệt với các vhost có domain khác nhau.File Vhost sẽ có nội dung như bên dưới
cd /etc/nginx/conf.d/
cat >> quyenbx.name.vn.conf << EOF
server {
        listen    80;
        server_name  quyenbx.name.vn www.quyenbx.name.vn;
        access_log off;
        error_log  /var/log/httpd/quyenbx.name.vn-error_log crit;

location ~* .(gif|jpg|jpeg|png|ico|wmv|3gp|avi|mpg|mpeg|mp4|flv|mp3|mid|js|css|html|htm|wml)$ {
        root /var/www/html/quyenbx.name.vn;
        expires 30d;
        }

location / {
        client_max_body_size    10m;
        client_body_buffer_size 128k;

        proxy_send_timeout   90;
        proxy_read_timeout   90;
        proxy_buffer_size    128k;
        proxy_buffers     4 256k;
        proxy_busy_buffers_size 256k;
        proxy_temp_file_write_size 256k;
        proxy_connect_timeout 30s;

        proxy_redirect  http://www.quyenbx.name.vn:8080   http://www.quyenbx.name.vn;
        proxy_redirect  http://quyenbx.name.vn:8080   http://quyenbx.name.vn;

        proxy_pass   http://127.0.0.1:8080/;

        proxy_set_header   Host   $host;
        proxy_set_header   X-Real-IP  $remote_addr;
        proxy_set_header   X-Forwarded-For $proxy_add_x_forwarded_for;
        }
}
EOF
Copy file Vhost vừa tạo tới thư mục /etc/nginx/sites-available
cp /etc/nginx/sites-available/quyenbx.name.vn.conf /etc/nginx/sites-enabled/quyenbx.name.vn.conf
Start lại service nginx
service nginx restart
chkconfig nginx on
Sửa file /etc/httpd/conf/httpd.conf để tạo thêm Vhost cho domain quyenbx.name.vn trên apache
sed -i 's/Listen 80/Listen 8080/g' /etc/httpd/conf/httpd.conf
Tạo file vhost trong apache
cd /etc/httpd/conf.d/
cat >> quyenbx.name.vn.conf << EOF
<VirtualHost *:8080>
ServerAdmin webmaster@quyenbx.name.vn
    DocumentRoot /var/www/html/quyenbx.name.vn
    ServerName quyenbx.name.vn
    ServerAlias www.quyenbx.name.vn
    <Directory "/var/www/html/quyenbx.name.vn">
               AllowOverride All
               Order allow,deny
               Allow from all
    </Directory>
       RewriteEngine on
    ErrorLog logs/quyenbx.name.vn-error_log
    CustomLog logs/quyenbx.name.vn-access_log common
</VirtualHost>
EOF
Tạo thư mục chứa code của website quyenbx.name.vn theo file cấu hình ở trên
mkdir -p /var/www/html/quyenbx.name.vn
Start lại service httpd
service httpd start
chkconfig httpd on
Chúng ta sẽ tạo 1 file index.html trong thư mục /var/www/html/quyenbx.name.vn để kiểm tra việc truy cập website
cd /var/www/html/quyenbx.name.vn
cat >> index.html << EOF
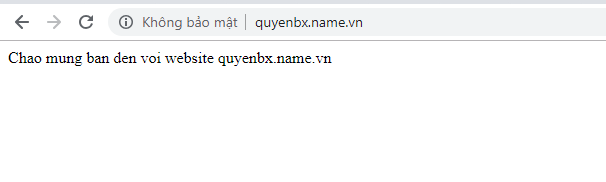
Chao mung ban den vơi website quyenbx.name.vn
EOF
Sau khi trỏ bản ghi cho domain về IP của server chạy website.Ở đây là trỏ về IP 10.10.11.165 chúng ta thử truy cập website từ trình duyệt web và kết quả trả về như hình bên dưới là thành công
Thực hiện bởi cloud365.vn