1. High Availability - Hướng dẫn triển khai Rabbit Cluster trên CentOS 7
High Availability - Hướng dẫn triển khai Rabbit Cluster trên CentOS 7
Nơi chứa các tài liệu tham khảo của dịch vụ Cloud365.
Hướng dẫn triển khai Haproxy Pacemaker cho Cluster Galera 3 node trên CentOS 7
HAProxy viết tắt của High Availability Proxy, là công cụ mã nguồn mở nổi tiếng ứng dụng cho giải pháp cân bằng tải TCP/HTTP cũng như giải pháp máy chủ Proxy (Proxy Server). HAProxy có thể chạy trên các mỗi trường Linux, Solaris, FreeBSD. Công dụng phổ biến nhất của HAProxy là cải thiện hiệu năng, tăng độ tin cậy của hệ thống máy chủ bằng cách phân phối khối lượng công việc trên nhiều máy chủ (như Web, App, cơ sở dữ liệu). HAProxy hiện đã và đang được sử dụng bởi nhiều website lớn như GoDaddy, GitHub, Bitbucket, Stack Overflow, Reddit, Speedtest.net, Twitter và trong nhiều sản phẩm cung cấp bởi Amazon Web Service.
MariaDB Galera Cluster là giải pháp sao chép đồng bộ nâng cao tính sẵn sàng cho MariaDB. Galera hỗ trợ chế độ Active-Active tức có thể truy cập, ghi dữ liệu đồng thời trên tất các node MariaDB thuộc Galera Cluster.
Pacemaker là trình quản lý tài nguyên trong cluster được phát triển bởi ClusterLabs. Pacemaker tương thích với rất nhiều dịch vụ phổ biến hiện có và hoàn toàn có thể tự phát triển module để quản lý các tài nguyên mà pacemaker chưa hỗ trợ.
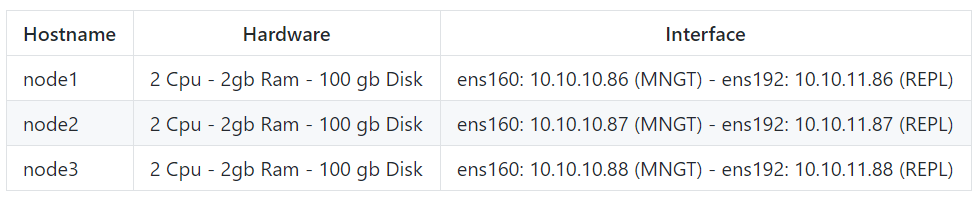
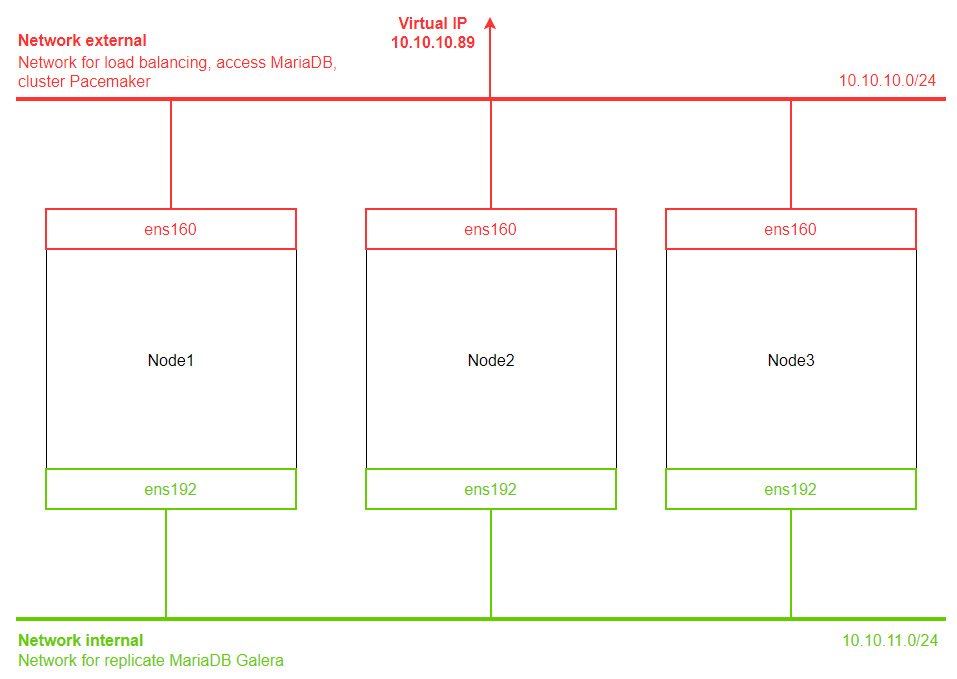
Mô hình triển khai
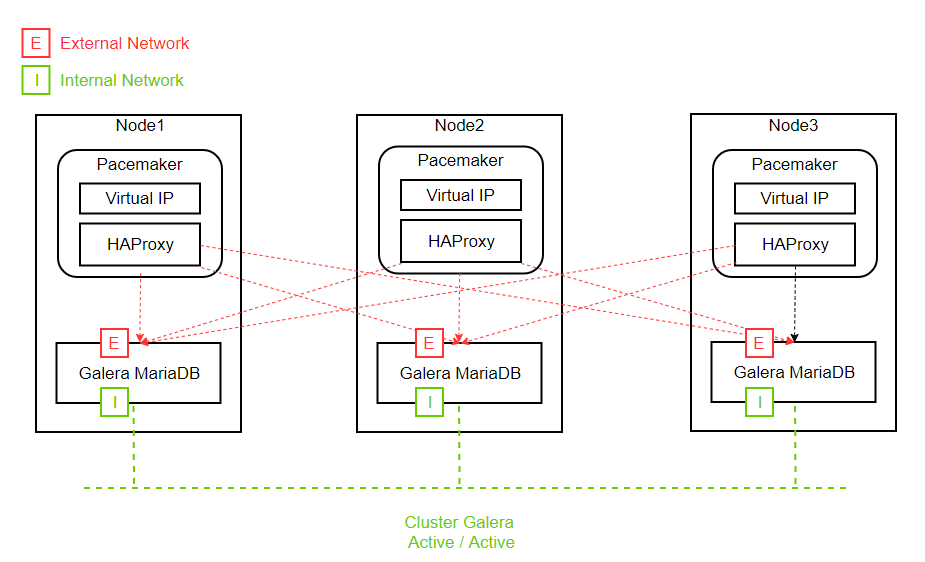
Mô hình hoạt động
Thực hiện cấu hình theo docs triển galera 3 node. Xem tại
Thực hiện trên tất cả các node
Cài đặt
sudo yum install wget socat -y
wget http://cbs.centos.org/kojifiles/packages/haproxy/1.8.1/5.el7/x86_64/haproxy18-1.8.1-5.el7.x86_64.rpm
yum install haproxy18-1.8.1-5.el7.x86_64.rpm -y
Tạo bản backup cho cấu hình mặc định và chỉnh sửa cấu hình HAproxy
cp /etc/haproxy/haproxy.cfg /etc/haproxy/haproxy.cfg.bak
Cầu hình Haproxy
echo 'global
    log         127.0.0.1 local2
    chroot      /var/lib/haproxy
    pidfile     /var/run/haproxy.pid
    maxconn     4000
    user        haproxy
    group       haproxy
    daemon
    stats socket /var/lib/haproxy/stats
defaults
    mode                    http
    log                     global
    option                  httplog
    option                  dontlognull
    option http-server-close
    option forwardfor       except 127.0.0.0/8
    option                  redispatch
    retries                 3
    timeout http-request    10s
    timeout queue           1m
    timeout connect         10s
    timeout client          1m
    timeout server          1m
    timeout http-keep-alive 10s
    timeout check           10s
    maxconn                 3000

listen stats
    bind :8080
    mode http
    stats enable
    stats uri /stats
    stats realm HAProxy\ Statistics

listen galera
    bind 10.10.10.89:3306
    balance source
    mode tcp
    option tcpka
    option tcplog
    option clitcpka
    option srvtcpka
    timeout client 28801s
    timeout server 28801s
    option mysql-check user haproxy
    server node1 10.10.10.86:3306 check inter 5s fastinter 2s rise 3 fall 3
    server node2 10.10.10.87:3306 check inter 5s fastinter 2s rise 3 fall 3 backup
    server node3 10.10.10.88:3306 check inter 5s fastinter 2s rise 3 fall 3 backup' > /etc/haproxy/haproxy.cfg
Cấu hình Log cho HAProxy
sed -i "s/#\$ModLoad imudp/\$ModLoad imudp/g" /etc/rsyslog.conf
sed -i "s/#\$UDPServerRun 514/\$UDPServerRun 514/g" /etc/rsyslog.conf
echo '$UDPServerAddress 127.0.0.1' >> /etc/rsyslog.conf

echo 'local2.*    /var/log/haproxy.log' > /etc/rsyslog.d/haproxy.conf

systemctl restart rsyslog
Bổ sung cấu hình cho phép kernel có thể binding tới IP VIP
echo 'net.ipv4.ip_nonlocal_bind = 1' >> /etc/sysctl.conf
Kiểm tra
$ sysctl -p

net.ipv4.ip_nonlocal_bind = 1
Tắt dịch vụ HAProxy
systemctl stop haproxy
systemctl disable haproxy
Tạo user haproxy, phục vụ plugin health check của HAProxy (option mysql-check user haproxy)
CREATE USER 'haproxy'@'node1';
CREATE USER 'haproxy'@'node2';
CREATE USER 'haproxy'@'node3';
CREATE USER 'haproxy'@'%';
Lưu ý: Thực hiện trên tất cả các node
Cài đặt gói pacemaker pcs
yum -y install pacemaker pcs

systemctl start pcsd
systemctl enable pcsd
Thiết lập mật khẩu user hacluster
passwd hacluster
Lưu ý: Nhập chính xác và nhớ mật khẩu user hacluster, đồng bộ mật khẩu trên tất cả các node
Chứng thực cluster (Chỉ thực thiện trên cấu hình trên một node duy nhất, trong bài sẽ thực hiện trên node1), nhập chính xác tài khoản user hacluster
$ pcs cluster auth node1 node2 node3

Username: hacluster
Password: *********
Kết quả
[root@node1 ~]# pcs cluster auth node1 node2 node3
Username: hacluster
Password: <mật khẩu user hacluster>
node1: Authorized
node3: Authorized
node2: Authorized
Khởi tạo cấu hình cluster ban đầu
pcs cluster setup --name ha_cluster node1 node2 node3
Kết quả
[root@node1 ~]# pcs cluster setup --name ha_cluster node1 node2 node3
Destroying cluster on nodes: node1, node2, node3...
node1: Stopping Cluster (pacemaker)...
node3: Stopping Cluster (pacemaker)...
node2: Stopping Cluster (pacemaker)...
node3: Successfully destroyed cluster
node1: Successfully destroyed cluster
node2: Successfully destroyed cluster

Sending 'pacemaker_remote authkey' to 'node1', 'node2', 'node3'
node1: successful distribution of the file 'pacemaker_remote authkey'
node2: successful distribution of the file 'pacemaker_remote authkey'
node3: successful distribution of the file 'pacemaker_remote authkey'
Sending cluster config files to the nodes...
node1: Succeeded
node2: Succeeded
node3: Succeeded

Synchronizing pcsd certificates on nodes node1, node2, node3...
node1: Success
node3: Success
node2: Success
Restarting pcsd on the nodes in order to reload the certificates...
node1: Success
node3: Success
node2: Success
Lưu ý:
ha_cluster: Tên của cluster khởi tạonode01, node02, node03: Hostname các node thuộc cluster, yêu cầu khai báo trong /etc/hostKhởi động Cluster
pcs cluster start --all
Kết quả
[root@node1 ~]# pcs cluster start --all
node1: Starting Cluster (corosync)...
node2: Starting Cluster (corosync)...
node3: Starting Cluster (corosync)...
node2: Starting Cluster (pacemaker)...
node3: Starting Cluster (pacemaker)...
node1: Starting Cluster (pacemaker)...
Cho phép cluster khởi động cùng OS
pcs cluster enable --all
Kết quả
[root@node1 ~]# pcs cluster enable --all
node1: Cluster Enabled
node2: Cluster Enabled
node3: Cluster Enabled
Bỏ qua cơ chế STONITH
pcs property set stonith-enabled=false
Cho phép Cluster chạy kể cả khi mất quorum
pcs property set no-quorum-policy=ignore
Hạn chế Resource trong cluster chuyển node sau khi Cluster khởi động lại
pcs property set default-resource-stickiness="INFINITY"
Kiểm tra thiết lập cluster
[root@node1 ~]# pcs property list
Cluster Properties:
cluster-infrastructure: corosync
cluster-name: ha_cluster
dc-version: 1.1.19-8.el7_6.2-c3c624ea3d
default-resource-stickiness: INFINITY
have-watchdog: false
stonith-enabled: false
Tạo Resource IP VIP Cluster
pcs resource create Virtual_IP ocf:heartbeat:IPaddr2 ip=10.10.10.89 cidr_netmask=24 op monitor interval=30s
Tạo Resource quản trị dịch vụ HAProxy
pcs resource create Loadbalancer_HaProxy systemd:haproxy op monitor timeout="5s" interval="5s"
Ràng buộc thứ tự khởi động dịch vụ, khởi động dịch vụ Virtual_IP sau đó khởi động dịch vụ Loadbalancer_HaProxy
pcs constraint order start Virtual_IP then Loadbalancer_HaProxy kind=Optional
Ràng buộc resource Virtual_IP phải khởi động cùng node với resource Loadbalancer_HaProxy
pcs constraint colocation add Virtual_IP Loadbalancer_HaProxy INFINITY
Kiểm tra trạng thái Cluster
[root@node1 ~]# pcs status
Cluster name: ha_cluster
Stack: corosync
Current DC: node1 (version 1.1.19-8.el7_6.4-c3c624ea3d) - partition with quorum
Last updated: Sun Feb 10 17:21:40 2019
Last change: Sun Feb 10 14:40:26 2019 by root via cibadmin on node1

3 nodes configured
2 resources configured

Online: [ node1 node2 node3 ]

Full list of resources:

 Virtual_IP     (ocf::heartbeat:IPaddr2):       Started node1
 Loadbalancer_HaProxy   (systemd:haproxy):      Started node1

Daemon Status:
  corosync: active/enabled
  pacemaker: active/enabled
  pcsd: active/enabled
Kiêm tra cấu hình Resource
[root@node1 ~]# pcs resource show --full
 Resource: Virtual_IP (class=ocf provider=heartbeat type=IPaddr2)
  Attributes: cidr_netmask=24 ip=10.10.10.89
  Operations: monitor interval=30s (Virtual_IP-monitor-interval-30s)
              start interval=0s timeout=20s (Virtual_IP-start-interval-0s)
              stop interval=0s timeout=20s (Virtual_IP-stop-interval-0s)
 Resource: Loadbalancer_HaProxy (class=systemd type=haproxy)
  Operations: monitor interval=5s timeout=5s (Loadbalancer_HaProxy-monitor-interval-5s)
              start interval=0s timeout=100 (Loadbalancer_HaProxy-start-interval-0s)
              stop interval=0s timeout=100 (Loadbalancer_HaProxy-stop-interval-0s)
Kiểm tra ràng buộc trên resource
[root@node1 ~]# pcs constraint
Location Constraints:
Ordering Constraints:
  start Virtual_IP then start Loadbalancer_HaProxy (kind:Optional)
Colocation Constraints:
  Virtual_IP with Loadbalancer_HaProxy (score:INFINITY)
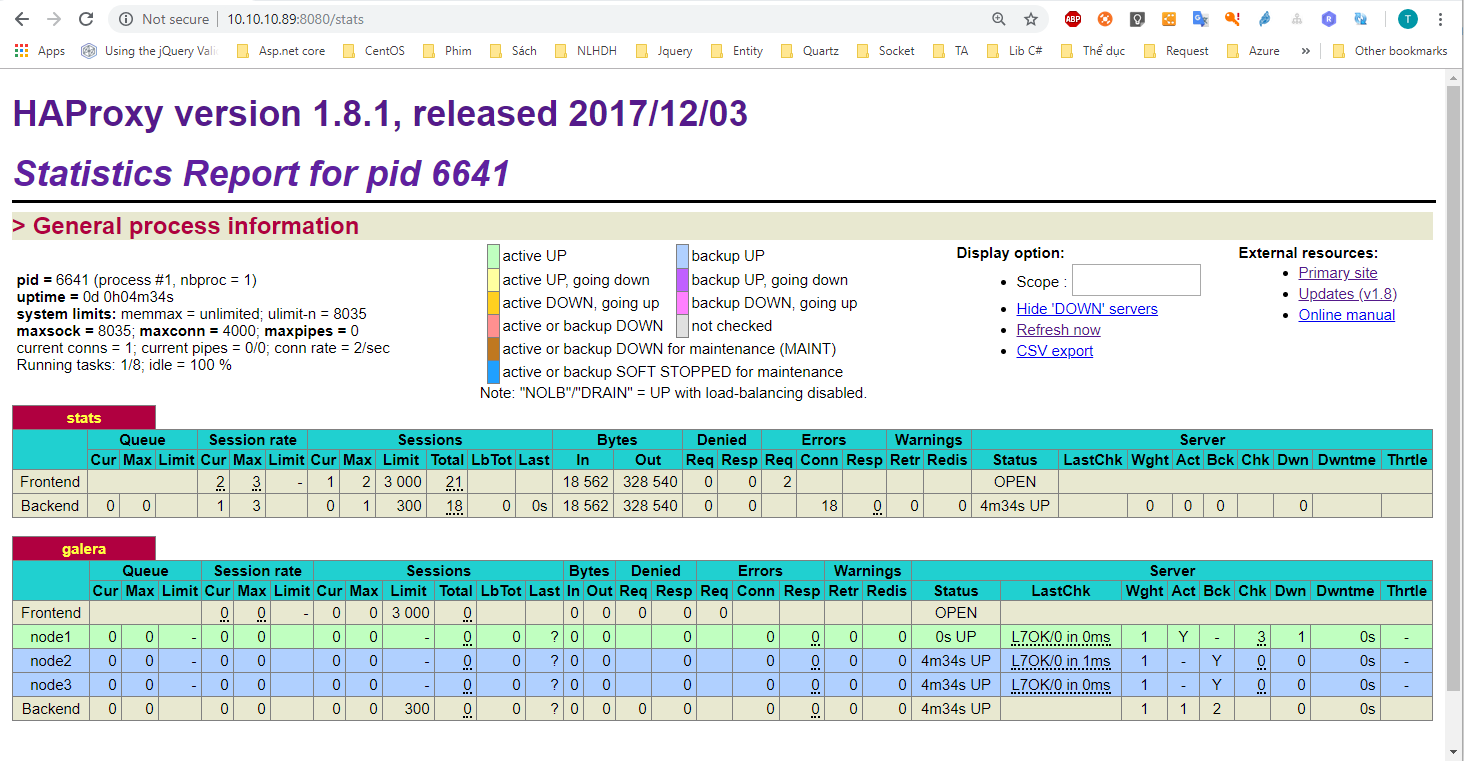
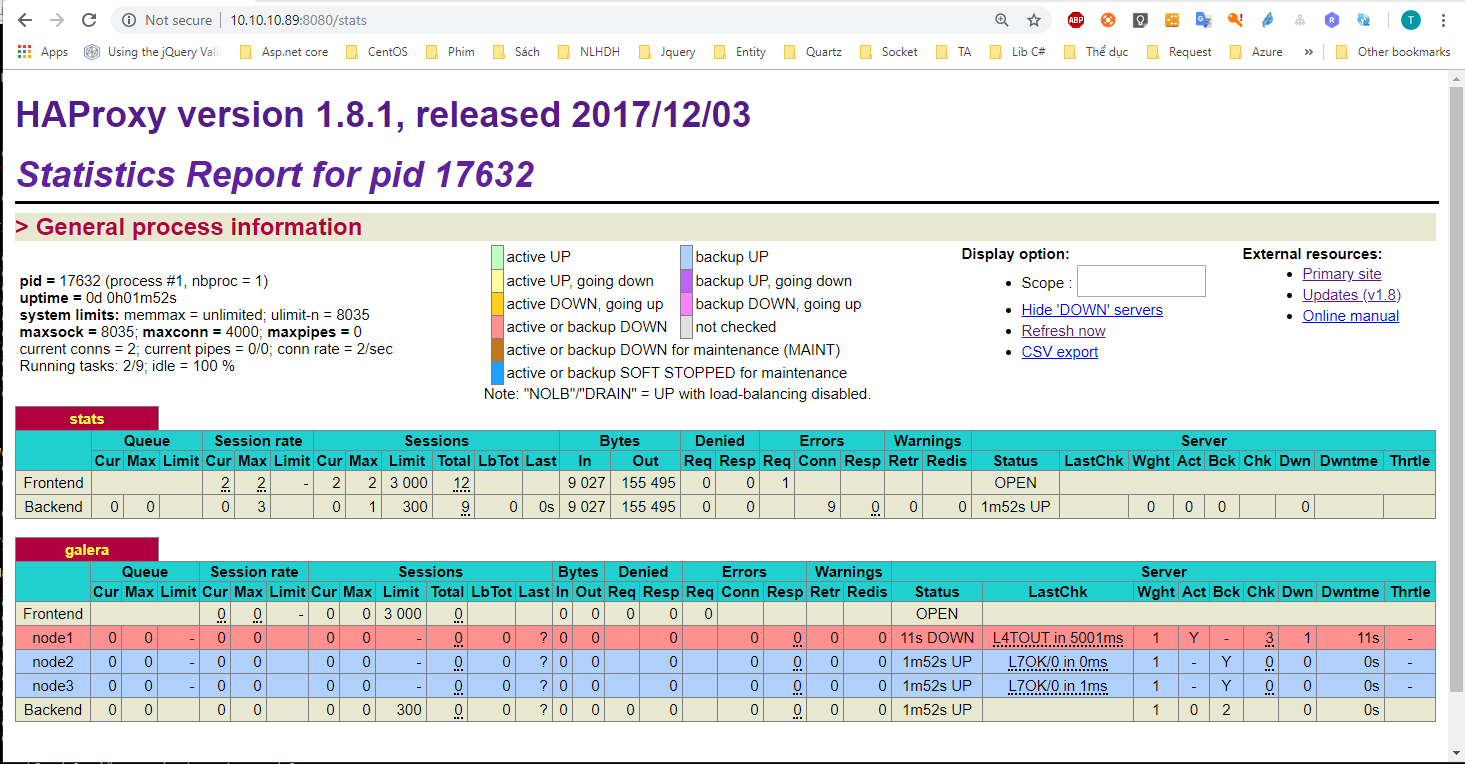
Truy cập http://10.10.10.89:8080/stats
Kết nối tới database MariaDB thông qua IP VIP
[root@node1 ~]# mysql -h 10.10.10.89 -u root
Welcome to the MariaDB monitor.  Commands end with ; or \g.
Your MariaDB connection id is 1493
Server version: 10.2.21-MariaDB MariaDB Server

Copyright (c) 2000, 2018, Oracle, MariaDB Corporation Ab and others.

Type 'help;' or '\h' for help. Type '\c' to clear the current input statement.

MariaDB [(none)]>
node1Truy cập node1, thực hiện tắt node1
init 0
Kiểm tra trạng thái Cluster, dễ thấy node1 đã bị tắt. Dịch vụ Virtual_IP và Loadbalancer_HaProxy được chuyển sang node2 tự động
[root@node2 ~]# pcs status
Cluster name: ha_cluster
Stack: corosync
Current DC: node3 (version 1.1.19-8.el7_6.4-c3c624ea3d) - partition with quorum
Last updated: Sun Feb 10 17:29:00 2019
Last change: Sun Feb 10 14:40:26 2019 by root via cibadmin on node1

3 nodes configured
2 resources configured

Online: [ node2 node3 ]
OFFLINE: [ node1 ]

Full list of resources:

 Virtual_IP     (ocf::heartbeat:IPaddr2):       Started node2
 Loadbalancer_HaProxy   (systemd:haproxy):      Started node2

Daemon Status:
  corosync: active/enabled
  pacemaker: active/enabled
  pcsd: active/enabled
Tại thời điểm node1 bị tắt, Pacemaker Cluster sẽ tự đánh giá, di chuyển các dịch vụ Virtual_IP và Loadbalancer_HaProxy sang node đang sẵn sàng trong Cluster, duy trì dịch vụ luôn hoạt động dù cho 1 node trong cluster gặp sự cố. Đồng thời, Cluster Galera sẽ vẫn hoạt động bình thường dù 1 node trong cluster xảy ra sự cố.
Kiểm tra trạng thái HAProxy, truy cập http://10.10.10.89:8080/stats
Thử kết nối tới Database MariaDB thông qua IP VIP
[root@node2 ~]# mysql -h 10.10.10.89 -u haproxy -p
Enter password:
Welcome to the MariaDB monitor.  Commands end with ; or \g.
Your MariaDB connection id is 1764
Server version: 10.2.21-MariaDB MariaDB Server

Copyright (c) 2000, 2018, Oracle, MariaDB Corporation Ab and others.

Type 'help;' or '\h' for help. Type '\c' to clear the current input statement.

MariaDB [(none)]>
Hướng dẫn cài đặt Galera 3 node trên CentOS 7
Hướng dẫn cấu hình HAProxy làm load balancing cho Apache trên CentOS 7
Tổng quan và các khái niệm quan trọng về cân bằng tải trong HAProxy
High Availability - Phần 2: Tổng quan về Pacemaker Corosync
Thực hiện bởi cloud365.vn
Chuồi các bài viết về High Availability cho các thành phần trong Web Server
High Availability - Hướng dẫn triển khai Rabbit Cluster trên CentOS 7
Hướng dẫn triển khai Haproxy Pacemaker cho Cluster Galera 3 node trên CentOS 7
Tổng quan về Resource trong Pacemaker
Tổng quan về Quorum, STONITH/Fencing
Tổng quan về Pacemaker Corosync
Tổng quan về Cluster